Reinspection Queue
 Updated
by
Arianne G.
Updated
by
Arianne G.
- Access Reinspection Queue
- Filter Reinspection Queue
- Use Reinspection Queue Map
- Filter by reinspection status in Advanced Search
- Administrator and Reinspector roles
- Apply this rule to
- With a XactAnalysis status of
- Hierarchy Type
- Area
- Desk Assessor
- For this CAT Code
- For this Claim Reference
- For these Countries/Regions
- For this Policy Type
- For this Coverage Type
- For this Business Unit
- For this Type of Loss
- For this Postal Code
- For date range between
- 1 of every (randomly)
- Percentage to add to queue
- Number of estimates
- For estimate value between
- Job Type
- Overhead & Profit
- Number of trades are
- Selected trades
- Contains pricelist category
- Activity Diary Report Uploads
- Test Assignments
The Reinspection Queue is a module in XactAnalysis® Quality Review (QR) that places all designated assignments into a list for reinspection. The first half of this guide explains how to access and use the general features of the reinspection queue. The last half explains the workflows for two types of users: supervisors/administrators, and reinspectors.
Reinspections can be completed in XactAnalysis QR or in Xactimate® based on your company’s settings; the workflows for both methods are explained in this guide. Your company’s workflow may differ from what is shown here.
The screen shots in this document are generic, and your company’s interface may vary.
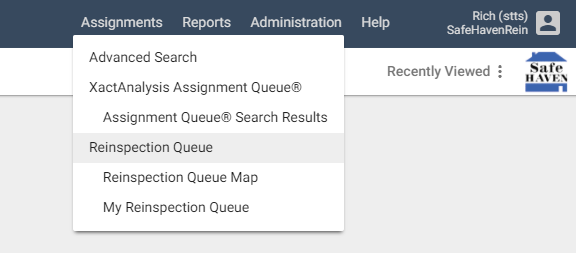
Access Reinspection Queue
- Select Reinspection Queue from the Assignments menu. To see only reinspections assigned to you, select My Reinspection Queue.
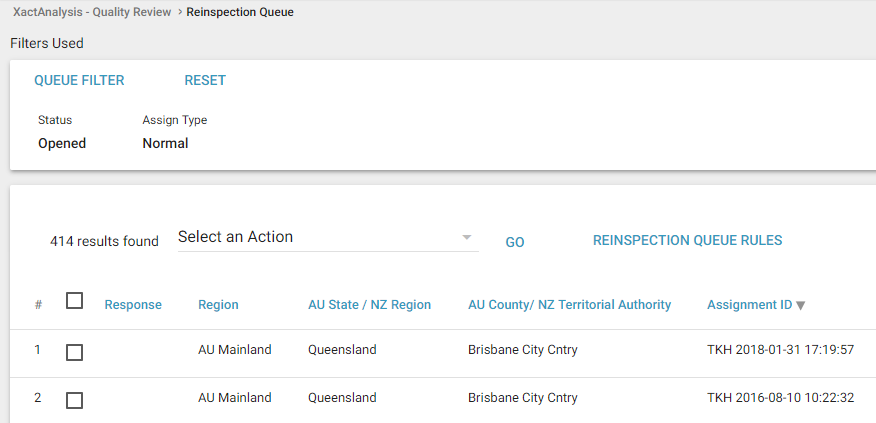
The Reinspection Queue displays a list of estimates. Users with Reinspector rights are able to see only reinspections assigned to them. Users with Reinspector Admin rights can see all reinspections, regardless of the assigned reviewer.
- You may sort columns alphabetically by selecting a heading title. To reset the queue after sorting columns or using the queue filter, select reset in the top left corner.
Filter Reinspection Queue
You can filter the queue to view only reinspections from a specific insurer, recipient, or reinspector. You can also filter by assignment status or date. To set the queue back to default view at any time, select reset.
Apply a filter
- Select Queue Filter.
- Set your filter criteria and click Search.
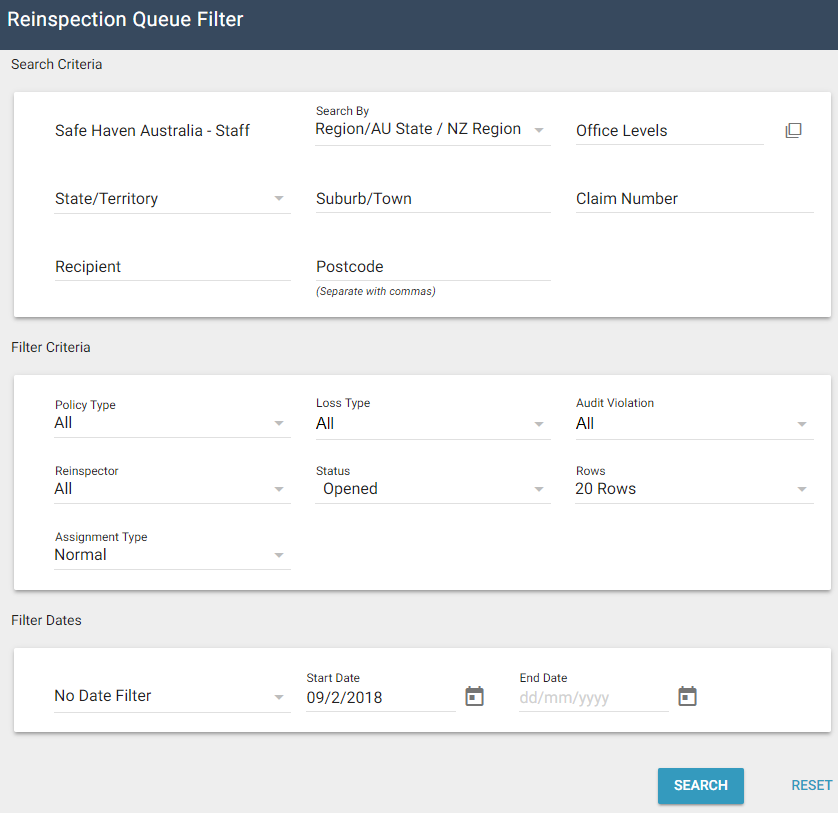
The Reinspection Queue will now show only estimates that match the parameters of your filter.
Use Reinspection Queue Map
The Reinspection Queue Map displays the geographic locations of reinspections in the Reinspection Queue and allows administrators to select reinspections and assign them to a reinspector.
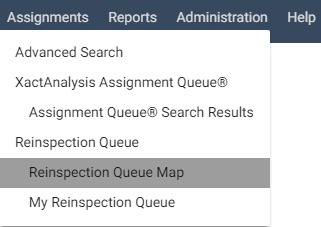
- Select Reinspection Queue Map in the Assignments menu to open the map.
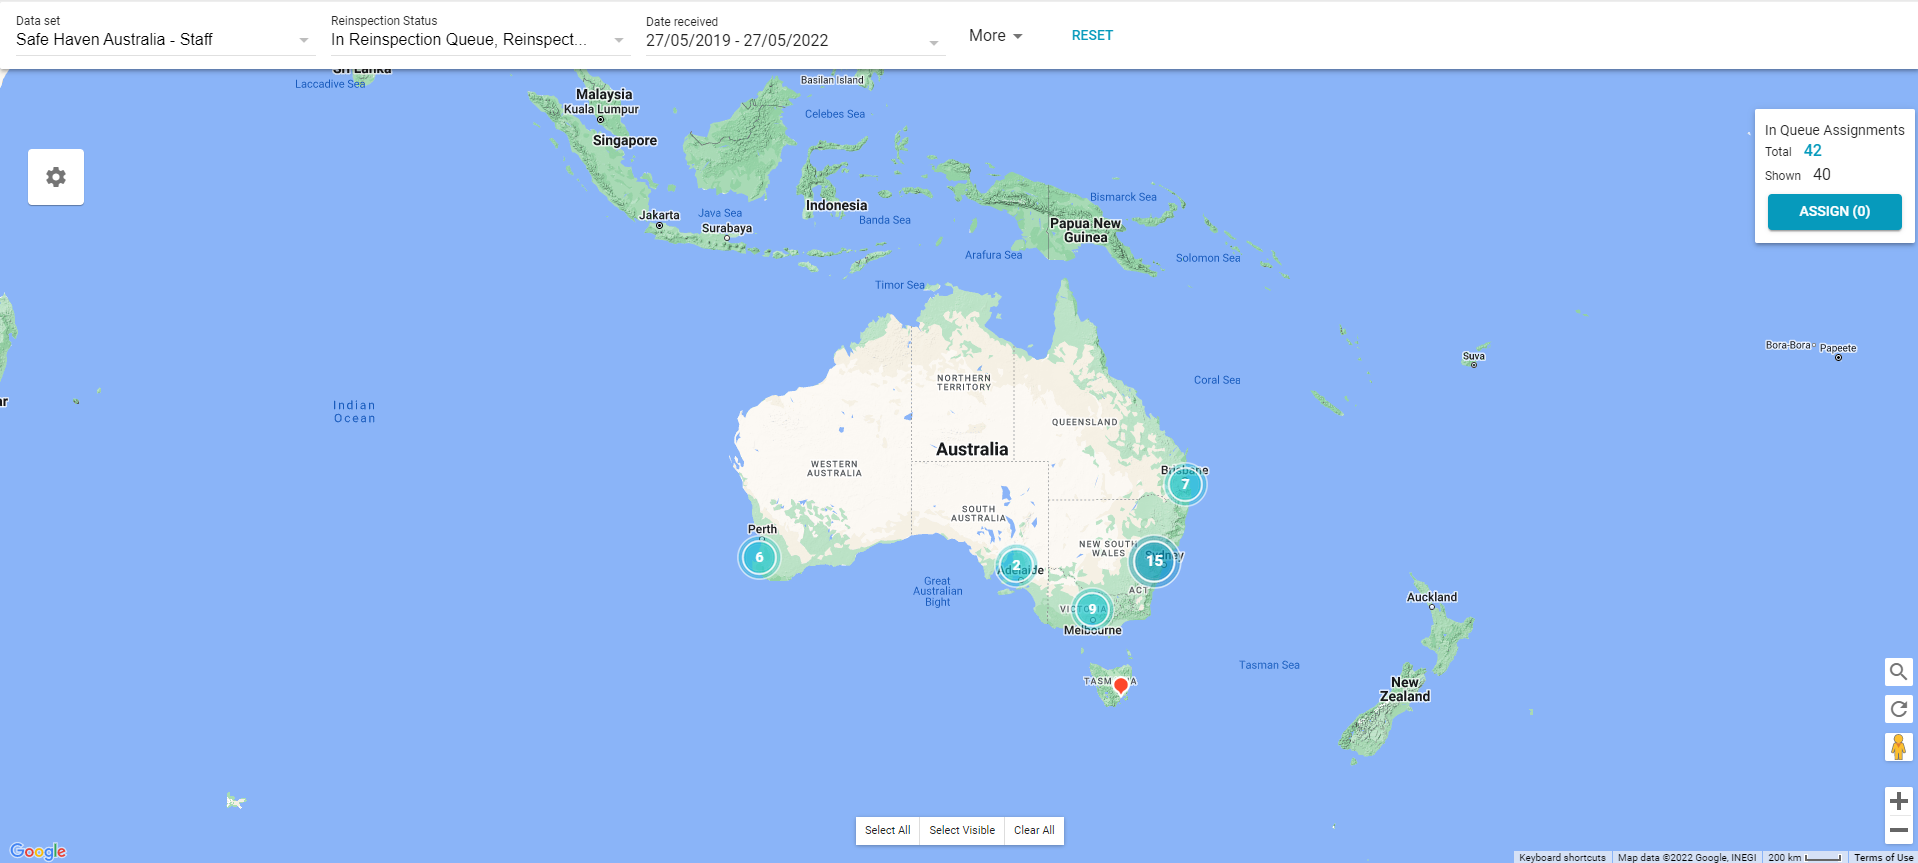
You can filter the map by Reinspection Status directly from the filter ribbon.
The More menu in the filter ribbon that allows you to apply additional filters to the map. The menu includes the following filters:
- State/Province
- Denial Status
- Policy Type
- Type of Loss
- Reinspection Queue Rule
- Test Assignments
- Zip/Postal Code
- Office Levels
- Claim Number
- Assignee
- Reinspector
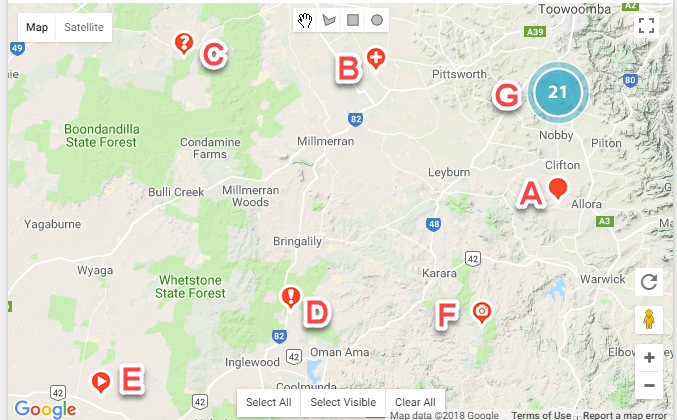
A - This marker represents a single assignment. Click the marker to select the assignment. Selected markers turn blue. Administrators can right-click the marker to open an info window.
B - This marker represents multiple assignments at a location. Click the marker to select all the assignments. Right-click to open an info window from which you can select individual assignments.
C - This marker indicates that the assignment address was not found. The marker's placement is near its expected location.
D - This marker indicates that the marker isn't accurate for the address.
E - This marker indicates that one or more videos exist for the assignment.
F - This marker indicates that one or more photos exist for this assignment.
G - Blue circles represent clusters of assignments in an area. The number of assignments is displayed in the circle. Click the circle to zoom in and view the individual assignments and additional clusters.
Additionally, the map provides several viewing tools:
- Click the plus and minus buttons in the bottom right corner of the map to zoom in and out.
- Click the Fullscreen icon in the top right corner of the map to expand the map so it fills your entire screen.
- Click the Satellite button in the top left corner of the map to view the map in satellite imagery mode.
- Click the person icon in the bottom right corner of the map and drag it to a location on the map to see actual photo imagery of the location.
- Click the reset icon in the bottom right corner of the map to reset the map with the assignment location in the center.
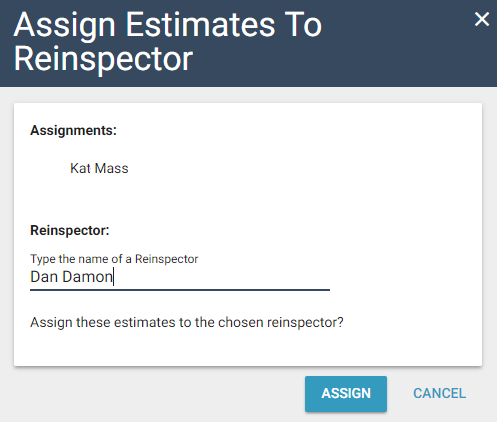
Assign a reinspector from the Reinspection Queue Map
- Locate the reinspections you want to assign on the map.
- Select the reinspections. You can click individual markers, or you can select one of the drawing tools at the top of the map and click and drag over a group of markers. Markers turn blue when they are selected.
- Click Assign. The Assign Estimates to Reinspector dialogue box appears.
- Type the name of a reinspector in the Reinspector field.
- Click Assign. You are notified that the estimates were successfully assigned to a reinspector.
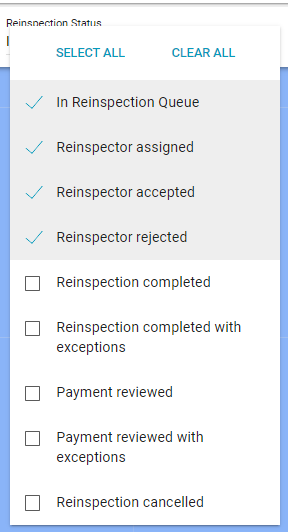
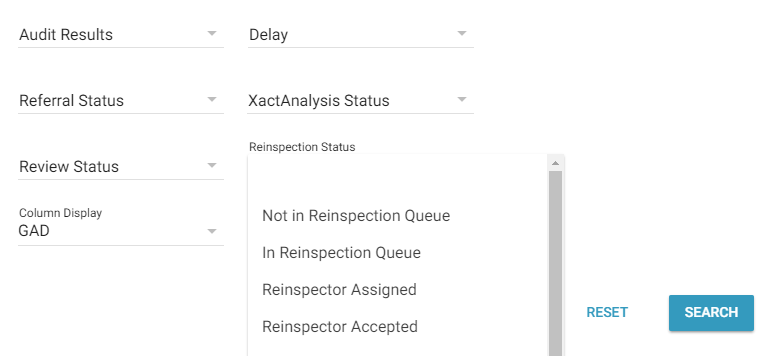
Filter by reinspection status in Advanced Search
- Use the Reinspection Status filter in Advanced Search to find assignments with specific reinspection statuses.
Administrator and Reinspector roles
Administrators and reinspectors use the Reinspection Queue in different ways. Their workflows are explained in this section.
User One: Administrator
Set up Reinspection Queue rules
Reinspection queue rules determine which returned estimates need to be reinspected. These estimates are automatically pulled from XactAnalysis and sent to the XactAnalysis QR Reinspection Queue. They can even be automatically assigned to a specific reinspector.
XactAnalysis can flag a variety of instances in an estimate to trigger a reinspection. For example, Administrator Jane can set up a complex rule that looks for estimates in the Safe Haven Staff data set with a Flood type of loss and a value between $5,000 and $15,000. Jane could set this rule to automatically assign these estimates to reinspector Dave. When Jane creates the rule, all estimates that fit the rule criteria are automatically sent to the reinspection queue and assigned to Dave.
Jane can also create simple rules. For example, she could set a rule to send one out of every four estimates to the reinspection queue, or any estimates that don't contain O&P.
- Select Reinspection Queue Rules on the Reinspection Queue page. You are taken to the Reinspection Queue Rules page.
- Click Add New Rule. The Add Queue Rule dialogue box appears.
- Select the criteria for your rule and click Ok. For more information about the fields and menus in this dialogue box, see Add Queue Rule fields and menus.
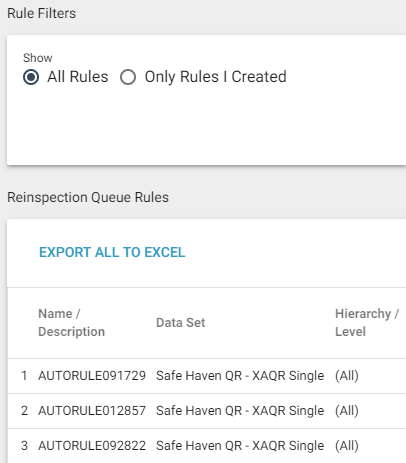
In the Reinspection Queue Rules page you can also do the following:
- View all rules or only rules you created using the Rule Filters.
- Copy or delete rules by clicking Copy or Delete to the right of a rule.
- Export rules to an Excel worksheet by clicking Export All To Excel.
Add an estimate to Reinspection Queue from Advanced Search
- In Advanced Search Results, select the check box of one or more returned estimates, or select an assignment and go to the Assignment Detail page.
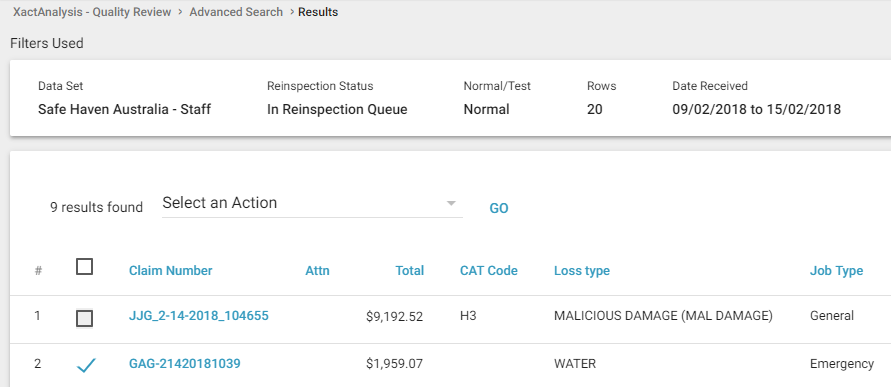
- Select Add to Reinspection Queue from the Select an Action menu.
- In the field that appears, type the name of a reinspector. Or, if you do not want to assign a reinspector at this time, type Unassigned. As you type, a list of reinspectors appears.
- Select a name or Unassigned from the list.
- Click Go. The Assign Reinspector dialogue box appears.
- Click Continue.
Assign reinspector from Reinspection Queue
- In the Reinspection Queue, select the check box for each estimate you would like to assign.
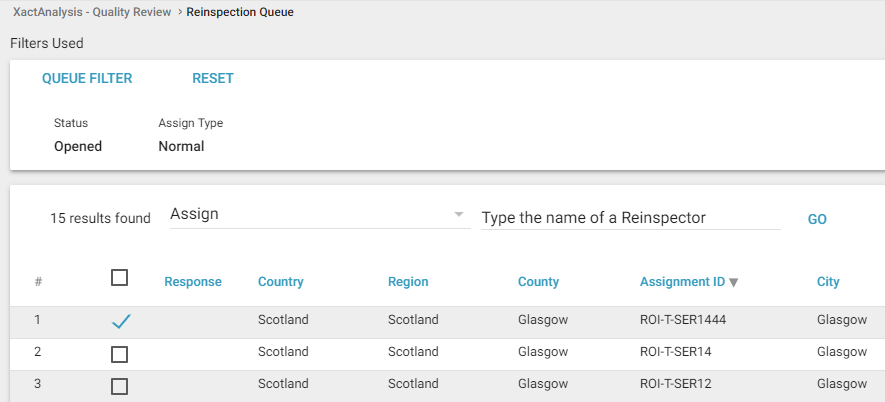
- Select Assign from the Select an Action menu.
- In the field that appears, type the name of a reinspector. As you type, a list of reinspectors appears.
- Select the name and click Go. The Assign Reinspector dialogue box appears. Click Continue.
User Two: Reinspector
As a Reinspector, you may accept and complete reinspections, send status update notifications, and view/print the completed reinspection. There are two ways to complete reinspections (if your company is configured for it). Method 1 is to accept and complete the reinspection in XactAnalysis QR. Method 2 is to accept the reinspection in XactAnalysis QR and complete it in Xactimate. If you will be editing line items and measurements during the reinspection, Xactimate provides the added benefit of automatically adjusting the underwrites, overwrites, O&P, taxes, and more. If you complete the reinspection in XactAnalysis QR, the figures have to be adjusted manually. XactAnalysis QR is a good option if you will only be answering the customizable questions on the Reinspection Form and will not be making changes to the estimate.
If you would like the Xactimate option enabled for your company, speak to your product specialist or account manager.
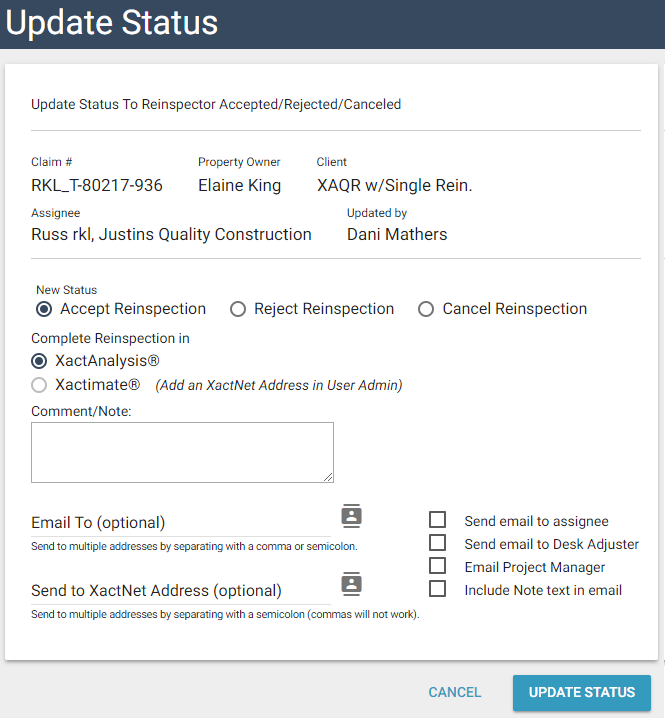
Accept reinspection
- In the Reinspection Queue or My Reinspection Queue, select an estimate to reinspect. The Assignment Detail page appears.
- In the Reinspection Status section of the Details tab, click Accept/Reject/Cancel.

- In the dialogue box that appears, if you select Cancel the reinspection is cancelled. If you select Reject, the reinspection is unassigned and sent back to the Reinspection Queue. To accept the reinspection, select Accept.
- You may choose to complete the reinspection in XactAnalysis QR or to complete the reinspection in Xactimate*. If you will be editing line items and measurements during the reinspection, Xactimate provides the added benefit of automatically adjusting the underwrites, overwrites, O&P, taxes, and more. If you complete the reinspection in XactAnalysis QR, the figures have to be adjusted manually. XactAnalysis QR is a good option if you will only be answering the customizable questions on the Reinspection Form and will not be making changes to the estimate.
If you choose to complete the reinspection in Xactimate, and there are multiple estimate versions, you can then select an estimate version to reinspect*. Only the most recently reinspected version of the estimate will be used for reporting purposes.
*This feature is controlled by a preference. Contact your product specialist or account manager to enable this feature for your company.
Accept multiple reinspections
- In the Reinspection Queue or My Reinspection Queue, select the check boxes of the estimates to be reinspected. In the Select an Action menu, select Accept Reinspections for XA if you want to complete the reinspections in XactAnalysis QR. Select Accept Reinspections for XM8 if you want to complete the reinspections in Xactimate, and click Go.
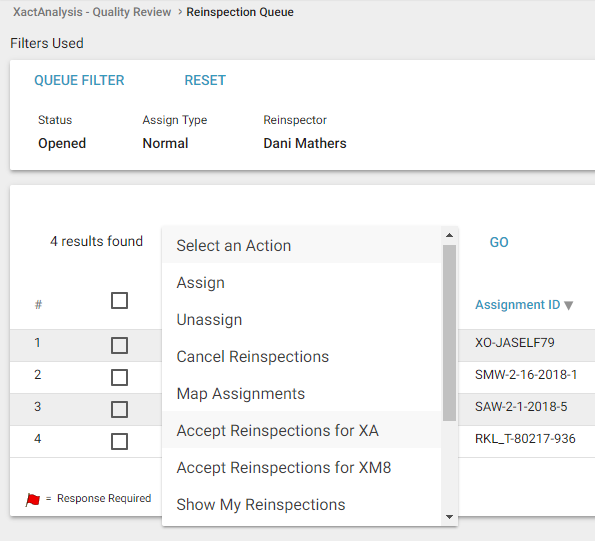
- In the dialogue box that appears, click Update Status.
Method 1: Complete reinspection in XactAnalysis QR
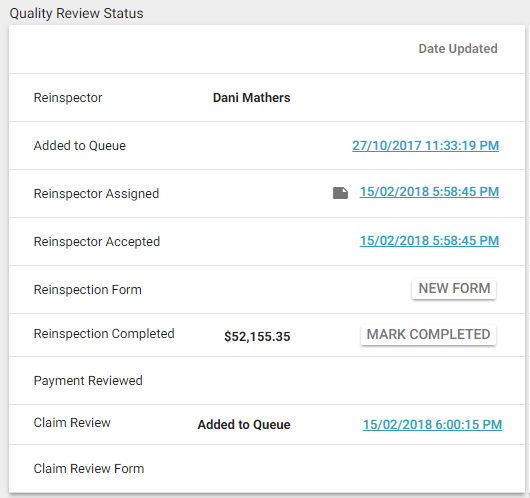
After you have accepted the reinspection, the Reinspector Accepted status is updated, and a link to a new reinspection form appears in the Reinspection Status section of the Details tab.
- Click New Form.
- You may keep the Reinspection Form open as you reinspect the estimate in XactAnalysis QR. To save the form, click Save at the bottom of the form.
- Complete by providing the missing claim information in the first section of the form. Some fields are automatically completed by XactAnalysis QR.

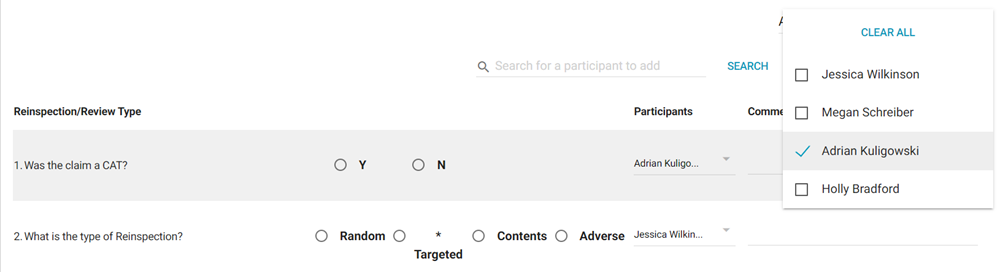
- Answer the reinspection questions by selecting the Yes/No radio buttons. You may comment on an individual answer using the Comments field to the right of the answer.
- Save the form.
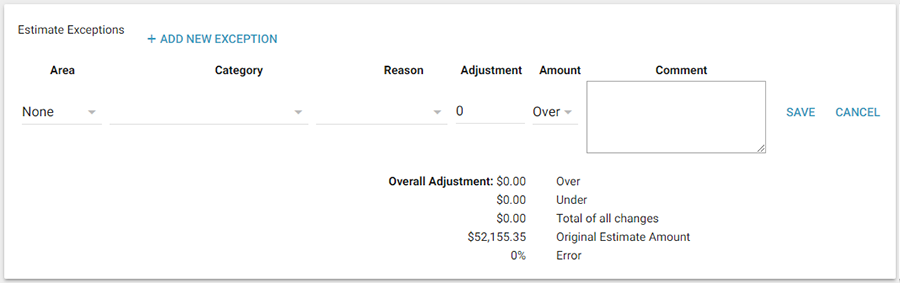
- Exceptions are used to log overwrites and underwrites found in the estimate. To add an exception (you may add more than one), perform the following steps:
- Select Add New.
- Select an area, category, and reason.
- Enter the adjustment amount, select over/under, and comment.
- Click Save. The Edit, Delete, and Copy links appear.
- Select [Copy] to copy an exception. You may use Copy to enter similar additional exceptions.
- Click Save after each exception entry.
- Select [Delete] to delete an exception.
Overall Adjustments appear below the list of exceptions.
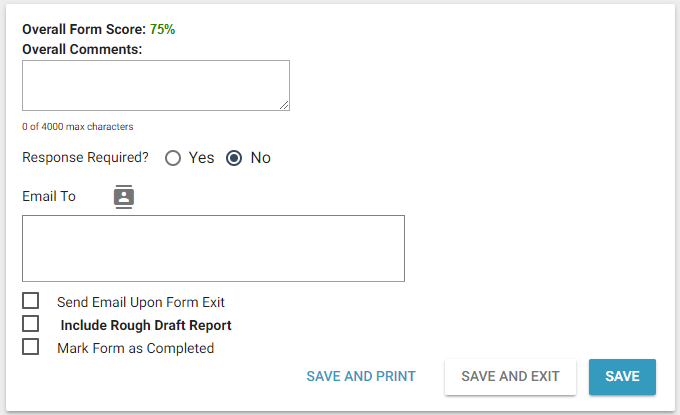
- In the Overall Comments field, enter your comments regarding the original estimate and the reinspected estimate, and any additional notes you want documented.
- If you would like to send the form via email, type the recipient’s email address in the Send email to: field, or use the button to select an email address from your address book.
- Response Required? If you want the email recipient to respond, select Yes and enter a deadline. If you select yes, the recipient’s email will say “Response required” in the subject line and specify the amount of time they have to respond in the body of the email. Their response email is added as a Note to the assignment.
- Select the Send Email Upon Form Exit check box to send the reinspection form to recipients via email when you exit the form.
- Select the Include Rough Draft Report check box to include the rough draft report in the email, in addition to a copy of the completed reinspection form.
- Select the Mark Form as Completed check box when you are finished with the reinspection.
- Click Save, Save and Exit, or Save and Print.
Method 2: Complete reinspection in Xactimate
After you have accepted the reinspection, the Reinspector Accepted status time stamp appears in the Reinspection Status section of the Details tab. The assignment was sent to your Xactimate address.
- Sign in to Xactimate and connect to XactAnalysis.
- Open your inbox, and accept the QR Assignment. If you do not have the price list used to write the original estimate, that was also sent and you should accept it.
- Open the reinspection assignment, which is a baseline copy of the actual estimate. You (the reinspector) can review and make changes to the reinspection version of the estimate. Xactimate tracks all the changes and logs the appropriate overwrites or underwrites.
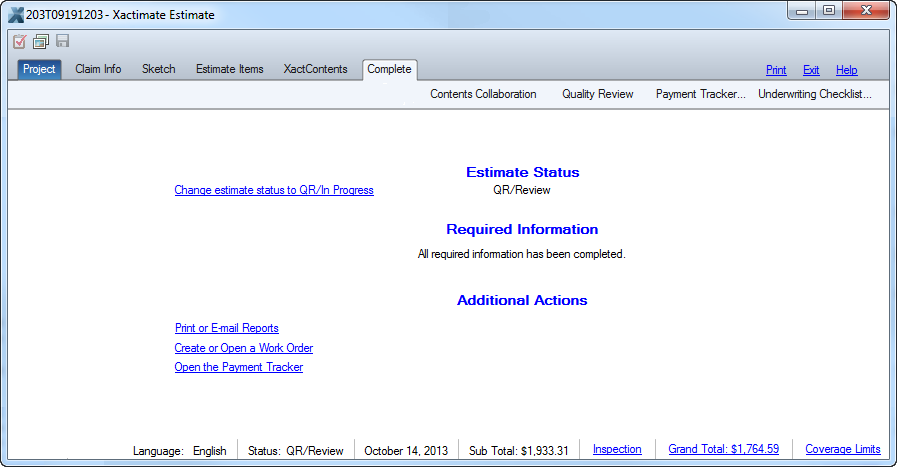
- When you are done making changes, select the Complete tab
- Select Change estimate status to QR/Review. The Quality Review option becomes available.
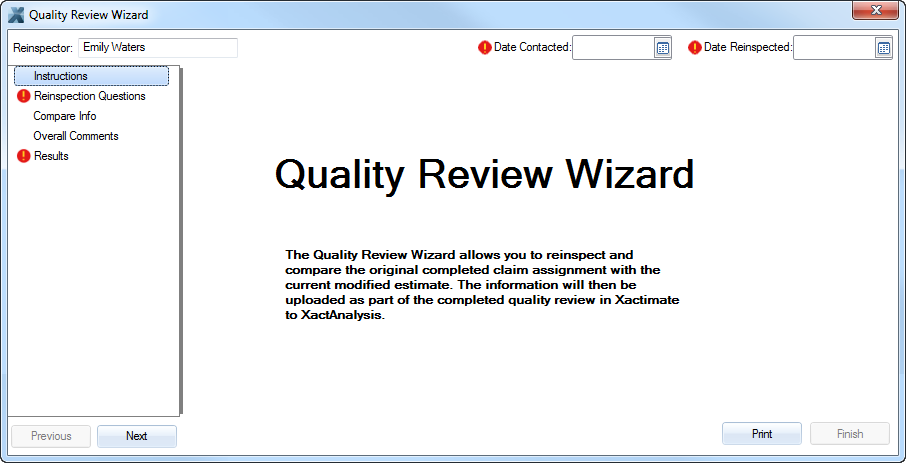
- Select Quality Review (at the top) to open the Quality Review Wizard. This is the Xactimate version of the Reinspection Evaluation Form. The Quality Review Wizard opens to the Instructions page.
- Enter your name, Date Contacted, and Date Reinspected at the top of the page.
- Click Next or select Reinspection Questions in the navigation tree.
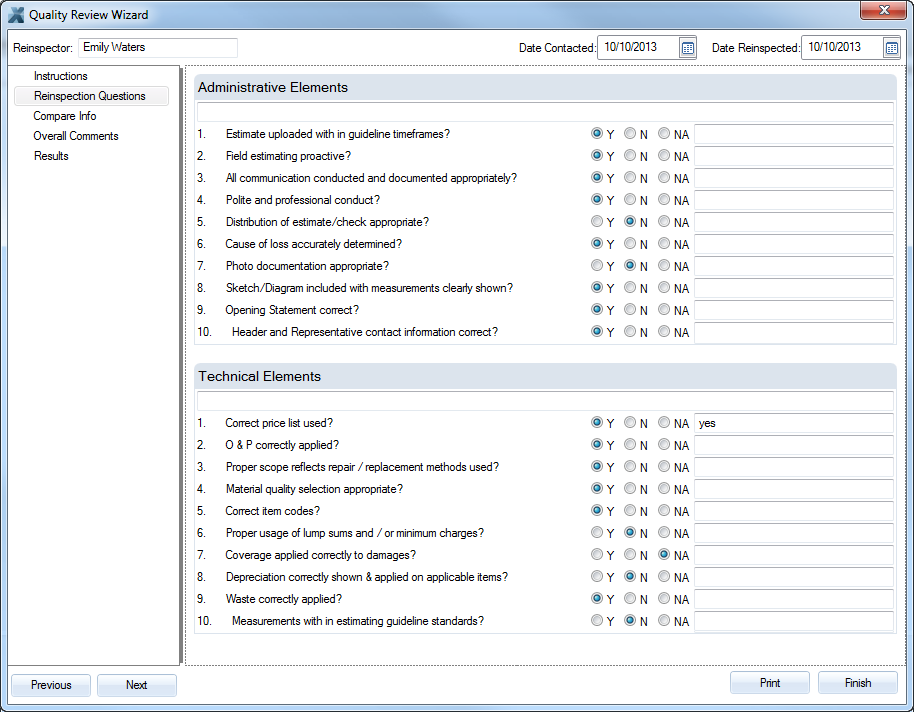
- The reinspection questions appear. Select Yes, No, or Not Applicable (NA). You may comment on sections (if your company’s list is separated by sections) and individual questions.
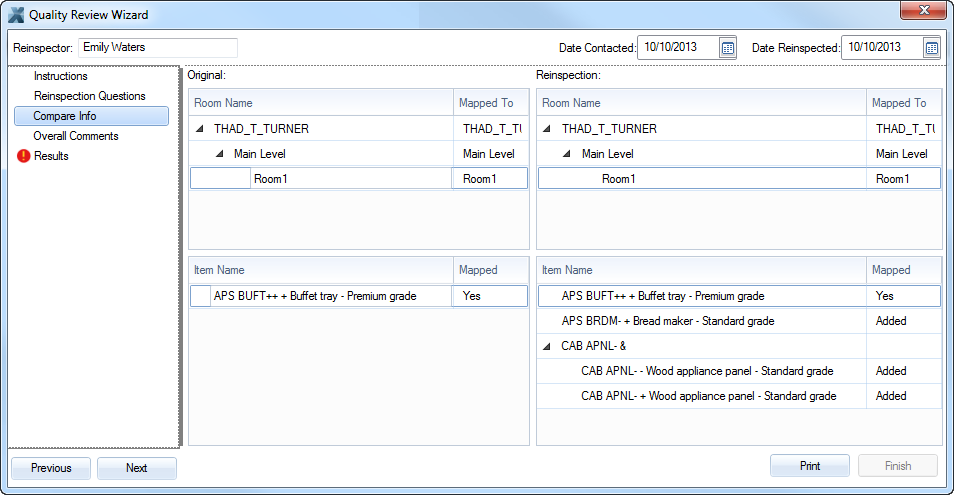
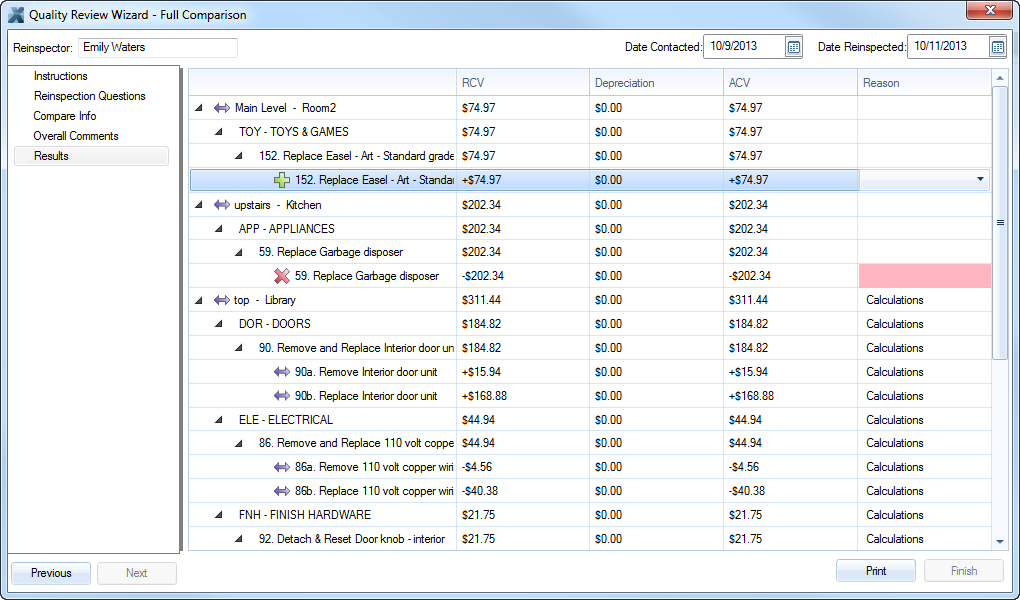
- After answering the reinspection questions, select Next or Compare Info in the navigation tree to compare your room and item changes to the original estimate’s rooms and items. In this case the garbage disposer was removed.
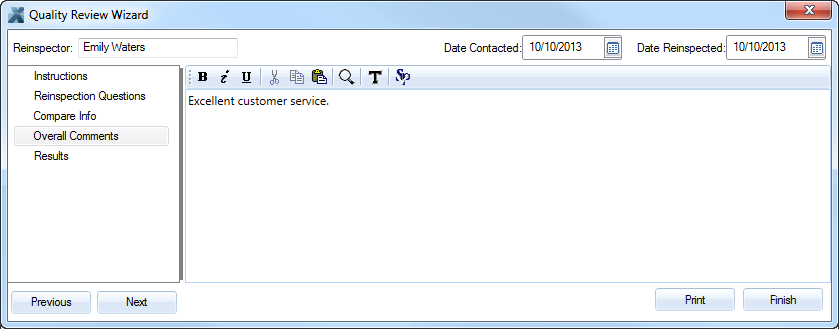
- Click Next or select Overall Comments in the navigation tree. Enter any additional comments for the review.
- Click Next or select Results in the navigation tree to review the changes in the Results page.
The Results page itemizes the changes by room and lists the reason for each changed item. A red “x” indicates that the item was removed. A green “+” indicates that the item was added. A blue arrow indicates that the item was edited.
Xactimate automatically selects reasons for certain activities. In this estimate the amount of copper wiring was changed, so Xactimate automatically selected the reason “Calculations.” If this was not the desired reason, the reinspector may change it.
If Xactimate is unable to determine the reason, the Reason field is highlighted in red, and the reinspector is required to select the appropriate reason.
If item prices were reduced, the amount is included in the Total Overwrites because the original estimate was overwritten.
If item prices were increased, the amount is included in the Total Underwrites because the original estimate was underwritten.
The overwrites and underwrites are totaled and an Error % is calculated - Select a reason for each field highlighted in red.
- After you have entered all the required information, click Finish. Xactimate packages the information in the Reinspection Assignment for upload back to XactAnalysis QR.
- Save and Exit the reinspection assignment.
- The reinspection assignment is placed in Xactimate’s Outbox. Click Connect to upload the reinspected assignment back to XactAnalysis QR. XactAnalysis QR receives the re-inspected estimate.
Mark reinspection Complete and view in Documents tab
- Click Mark Completed in the Details tab. A time stamp appears by the Reinspection Completed status.
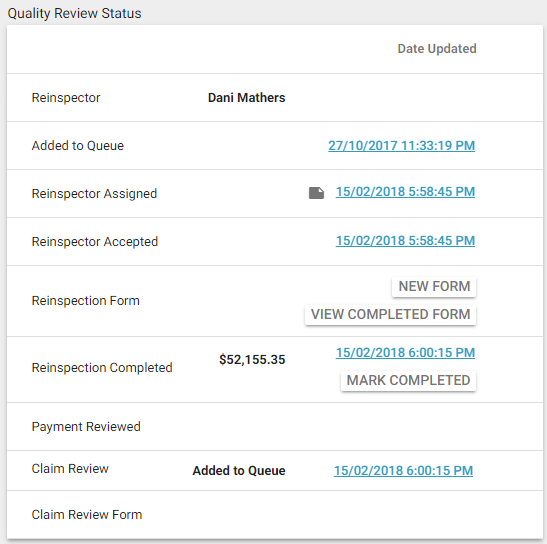
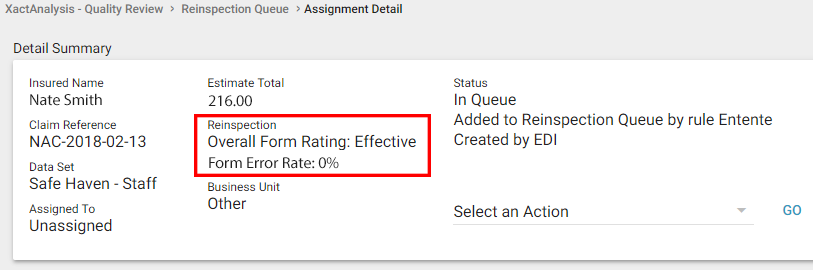
And the reinspection form rating appears in the Detail Summary.
Whether the reinspection was completed through XactAnalysis QR or through Xactimate, the following events occur:
- The reports are populated with the information. See Quality Review Reports for more information.
- The Reinspection Form is saved in the Documents tab.
- If multiple reinspection forms have been completed, they will all be saved to the Documents tab.
- The reinspection is removed from your Reinspection Queue.
- Personal and Program Rules may be triggered.
The Documents, Photos, and Sketches tabs in the Assignment Detail page show all documents, photos, and sketches that were uploaded with the re-inspected estimate.
Add Queue Rule fields and menus
Data Set(s)
Select one or more data sets to allow estimates from those data sets to enter the queue.
Rule Name / Description
Enter the name or description of your rule.
Rule Priority
Select a priority for your rule: None, 1 (First Group Processed), or 2 (Second Group Processed). The rules filter estimates based on priority. XactAnalysis will filter all the estimates with the first priority rule, and then filter the remaining estimates based on the second priority rule.
ALL REQUIRED (All of the selected conditions must be met to send an assignment to the reinspection queue)
Apply this rule to
Select to apply the rule to future or existing estimates
With a XactAnalysis status of
Select a status or leave it as (All). See Statuses for status definitions. If you select Cancelled or Client Approved, you can also filter by how that status is set (Automatically, Manually, or Either)
Hierarchy Type
Select a hierarchy type: Geographic Organizational, or Individual
Area
Select an area for the rule. Leave it as (All) to allow assignments from all data set (program) areas to enter the queue.
Desk Assessor
Select a desk assessor. Leave this field blank to allow estimates with any desk assessor to enter the queue.
For this CAT Code
Enter a CAT Code into the auto-complete field and select from the list. To enter more than one CAT Code, separate them by commas. Leave this field blank to allow estimates with any CAT code to enter the queue.
For this Claim Reference
Enter a claim reference. Leave this field blank to allow any claim number to enter the queue.
For these Countries/Regions
Select one or more countries/regions from the menu. Leave this field blank to allow estimates from any country/region to enter the queue.
For this Policy Type
Select a policy type from the menu. Select (All) to allow estimates with any policy type to enter the queue.
For this Coverage Type
Select a coverage type from the menu. Select (All) to allow estimates with any coverage type to enter the queue.
For this Business Unit
Select a business unit from the menu. Select (All) to allow estimates with any business unit to enter the queue.
For this Type of Loss
Select one or more types of loss from the menu. Select (All) to allow estimates with any type of loss to enter the queue.
For this Postal Code
Enter one or more postal codes (separated by commas) or a range of postal codes separated by “..” (for example 39200..39299). Leave this field blank to allow estimates from any postal code to enter the reinspection queue.
For date range between
Select a date range or select Monthly, Quarterly, or Annually from the menu. The rule will be applied to only estimates within the specified range or it will only be applied monthly, quarterly, or annually. Leave these fields blank if you do not wish to apply a date range to the rule.
1 of every (randomly)
Enter a number to set up random reinspections for 1 of every [number] estimates.
Percentage to add to queue
Enter a percentage of claims to randomly be added to the queue.
Number of estimates
Enter a number of estimates to send to the queue. Select the per assessor/builder check box to send a specific number of estimates per assessor/builder.
For estimate value between
Enter a value range.
Job Type
Select a job type.
Overhead & Profit
Select whether to include estimates with O&P or No O&P. Select No Selection for neither.
Number of trades are
Select whether or not to include estimates with greater than or less than a certain number of trades, or select No Selection for neither. Enter the greater than or less than number in the provided field.
Selected trades
Select a trade.
Contains pricelist category
Select a country, then select a pricelist category from the menu.
Activity Diary Report Uploads
Select the check box to exclude activity diary report uploads.
Test Assignments
Select the check box to include test assignments. Leave unchecked to exclude test assignments.
ONE REQUIRED (This section appears when you select "Apply this rule to only future estimates" in the All Required section.)
Audit Results
Select Any to send estimates with any audit results into the queue. Select Specific and one or more audit results from the list that appears.
Audit Violation Count
Enter a number. All estimates with that number of violations are sent to the Review Queue. Select the Greater than check box to send estimates with violations totaling more than the entered number to the review queue.
Category – Selector Codes within Estimate Include
Select the check boxes to include estimates with specific selector codes in the review queue.
Line Item Quality
Select the check boxes to include estimates with specific line item qualities in the review queue.
Price List
Select the Deviations check box to send estimates with price list deviations into the review queue. For Price Only Deviations, you can choose to identify estimates by the number of items with deviations or by the deviation amount.
OTHER
Client Approval
Select Manual to allow client reviewers to manually review and approve the estimates in the queue. Select Auto Approve to automatically approve the estimates in the queue based on the criteria of the rule.
Email To
Enter one or more email addresses (separated by commas). XactAnalysis sends an email to the specified addresses when an estimate triggers this rule and is sent to the queue.
Automatically assign to
Enter the name of a reinspector to be specifically assigned or select (All). Estimates sent to the queue by this rule can be automatically assigned a reinspector that you specify here.
Only Reinspect Once
Select the check box to allow only one reinspection per estimate.