Assignment Detail
 Updated
by
Arianne G.
Updated
by
Arianne G.
- Access the Assignment Detail page
- Complete actions using the Select an Action menu
- Assignment Detail tabs
- DETAILS
- File examiner tasks
- CLIENT/POLICY
- MAP
- ACTION ITEMS
- Delete an action item
- Mark an action item complete
- Standard Action Item list
- Assignment Received
- Enter Assignment Queue
- Send Notification
- Download Assignment
- Contact Customer
- Inspect Job Site
- Upload Non $0 Estimate
- Upload Estimate
- Upload Correction
- Upload Report
- Submit to Insurer Review Queue
- Submit to Service Provider Review Queue
- Assign Insurer Reviewer
- Assign Service Provider Reviewer
- Insurer Review with Exceptions
- Insurer Review
- Service Provider Review with Exceptions
- Service Provider Review
- Review with Exceptions
- Review
- Assigned Out of Assignment Queue
- QA Rejected
- QA Approved
- Collaboration Checked Out
- Collaboration Checked In
- Client Approved
- Client Rejected
- Start Work
- Complete Job
- File Closed
- Entered Reinspection Queue
- Assign Reinspector
- Complete Reinspection
- NOTES
- DOCUMENTS
- PHOTOS
- VIDEOS
- SKETCHES
- COMMUNICATION LOG
- HISTORY
- PREVIOUS LOSS
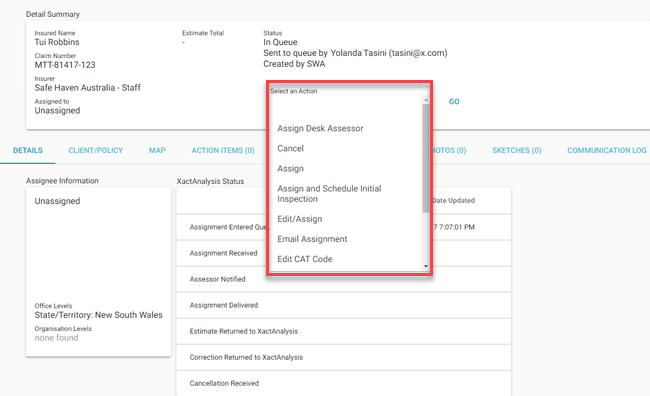
On the Assignment Detail page, you will see a Detail Summary that includes information about the insured name, claim number, data set, assignee, status, and estimate total. You will also see a Select an Action menu that you can use to complete a number of actions, and a number of tabs from which you can review assignment information, update statuses, and add notes and files.
Access the Assignment Detail page
There are many ways to access an Assignment Detail page for a specific assignment:
- Select an assignment from Advanced Search Results, the Assignment Queue®, the Reinspection Queue, or many of the M.I. Management Information reports.
- Type a claim reference into the Quick Search field on the Welcome page. Click Search.
- Select a claim reference from the Recently Viewed Assignments table on the Welcome page.
Complete actions using the Select an Action menu
You can complete a number of actions by using the Select an Action menu in the Detail Summary section:
Resend QR Assignment
This option is a preference. It appears only if your company has turned on this feature and after a QR assignment has been sent to an assessor/builder. When an assignment is lost or not received by an assessor/builder, or if an assignment needs additional work, you can resend the assignment to the assignee.
Email Assignment
Select Email Assignment to email the entire Assignment Detail page or a selected portion of the Assignment Detail page to selected recipients. This may be useful when working with the insured, interested parties, or collaborators.
Edit CAT Code
Select Edit CAT Code to add or edit a catastrophe code associated with the assignment. Many features in XactAnalysis can sort data by CAT code, and reports can be generated with data based on specific CAT codes.
Download Details
Select Download Details to download an Excel spreadsheet that includes insured, policy, and loss information, as well as estimate amounts and status completion dates.
Uncompress Files
This option appears if you have accessed an older assignment. After an assignment ages a set amount of time, the assignment is archived and associated documents, photos, and sketches are compressed. Select Uncompress Files to access any document, photos, and sketches associated with this assignment.
Create Duplicate Assignment
When you select Create Duplicate Assignment, the Send Work Assignment page appears with property owner/risk information, claim information, and policy information already populated from the assignment. This makes it easy to create a new assignment with the same Client/Policy information.
Send Read-Only Estimate
Select Send Read-Only Estimate to send a read-only estimate to an XactNet Address. The recipient will be able to view the estimate but make no alterations. This option is only available after an assignment is assigned.
Add to Reinspection Queue
This option appears if your company uses the Reinspection Queue. Select Add to Reinspection Queue to add the assignment to the Reinspection Queue. In the field that appears, you can either type a reinspector’s name to assign a reinspector or type Unassigned to leave the reinspection unassigned. Assignments that have not been returned with an estimate cannot be assigned a reinspector.
Create Referral Assignment
When completing an estimate, an assignee may need the assistance of additional assessors/builders with other areas of expertise, such as contents or roofing specialists. They can refer assignments to these specialists, who can then complete portions of the estimate. Select Create Referral Assignment to create a referral assignment. For more information, see Referral Assignment.
Save Documents
This option allows you to save assignment information, including documents and images, to your computer. This may be useful if you need to work remotely. When you select Save Documents, a page appears that allows you to download information, documents, or images.
Assign Business Unit
Some companies use a feature in XactAnalysis that allows them to create business units. For example, a company may create separate commercial and residential business units. Many features in XactAnalysis can sort data by business unit, and reports can be generated with data based on specific business units. This option appears when a company has turned on the business unit feature and created business units. Select Assign Business Unit to assign the assignment to a specific business unit.
Reassign Business Unit
This option appears when an assignment has already been assigned to a business unit. Select Reassign Business Unit to reassign the assignment to a different business unit.
Update Program Location
This option allows you to reassign the assignment to a different program location within your company's hierarchy.
View in the GIC Viewer
This option allows you to access Geospatial Insurance Consortium (GIC) high-resolution imagery from an assignment. GIC allows you to compare before and after aerial images of damage to the claim area. You must have a GIC subscription to use this feature.
Assignment Detail tabs
On the Assignment Detail page, you will see a Detail Summary that includes information about the insured name, claim reference, data set, assignee, status, and estimate total. You will also see a number of tabs from which you can review assignment information, update statuses and add notes and files. The following sections discuss each tab.
DETAILS
The Details tab is displayed by default and shows the assignee information, XactAnalysis® statuses, workflow statuses, and approval statuses (see Statuses for a complete list of statuses in XactAnalysis).
The Assignee Information section displays information about the builder or assessor assigned to the assignment and their contact information. The XactAnalysis Status section displays system-based statuses that are automatically tracked by XactAnalysis. The Workflow Status and Approval Status sections display statuses that can be updated manually.
Assessor/builder tasks
The following tasks are usually accomplished by the assessor or builder in Xactimate®:
Customer Contacted
This status informs the insurer when the customer was contacted. You update this status in the Details tab, or XactAnalysis updates it with information received from Xactimate.
Site Inspected
This status informs the insurer when the property was inspected. You update this status in the Details tab, or XactAnalysis updates it with information received from Xactimate.
Job Started
This optional status informs the insurer when the job has been started.
Job Completed
This optional status informs both parties then the job has been completed.
Work Not Proceeding
This optional status informs both parties when the client or insured has refused the job.
File examiner tasks
The following tasks are usually accomplished by file examiners:
Reviewer Assigned
This status indicates that a completed estimate has entered the estimate review queue to be reviewed, and the review administrator has assigned it to a specific reviewer.
Review Accepted
This status indicates that the person assigned to complete the review has accepted the review.
Reviewed with Exceptions
This status indicates that the reviewer completed reviewing the estimate but found problems. In this situation, the estimate often requires additional work. When the additional work is complete, the estimate is uploaded again, and a subsequent review is performed.
Review Completed
This status indicates that the estimate review is complete and has no problems.
QA Approved
This is an optional quality-control status that insurers or service provider companies often use to indicate that a specific type of review has been satisfactorily completed.
Client Approved
This is also an optional quality-control status that carriers or service provider companies often use to indicate that a specific type of review has been satisfactorily completed.
File Status
This optional status allows the insurer to mark the assignment Closed. When an assignment is marked Closed, the assignee can no longer update the estimate, unless the carrier updates the status to File Reopened.
Other tasks
The following tasks can be accomplished by anyone with appropriate rights:
Collaboration Status
This status allows any user with the Collaboration Admin user right to assign an estimate for collaboration, and shows the date and time of any collaboration that has occurred. For more information, see Estimate Collaboration.
Attention Status
This status allows any user to mark an assignment as Attention Needed, indicating that the assignment is time-sensitive or requires special considerations.
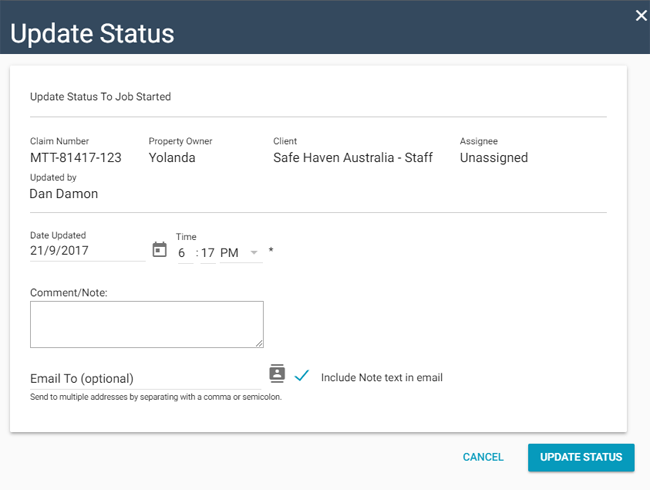
Update a status
In XactAnalysis Quality Review, you can only update the Onsite Reinspection status on the Details tab.
- Click Update in the Onsite Reinspection row. The Update Status dialogue box appears.
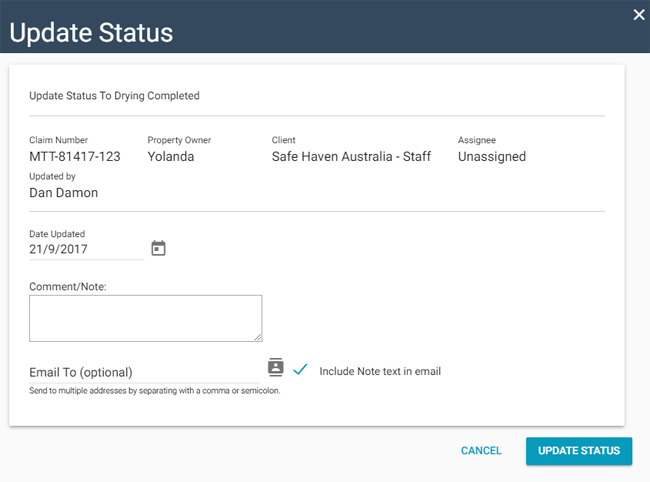
- Complete the Update Status dialogue box as follows:
- Date Updated: This field defaults to the current date. You can change the date as needed.
- Onsite Reinspection Reason: Select the reinspection reason from the drop-down menu.
- Comment/Note: Type a note in this field. The note will be added to the Notes tab.
- Email To: Enter a recipient email address, or select email addresses from your address book. Check the boxes to send an email to additional recipients and to include the Note text in the email.
- Send to XactNet® Address: Enter a recipient XactNet address, or select XactNet addresses from your address book. Separate multiple addresses with a semicolon.
- Click Update Status. The status is updated on the Details tab.
Related: Statuses
CLIENT/POLICY
The Client/Policy tab displays the property owner and risk information, claim information, broker information, and policy information that was entered when the assignment was created.
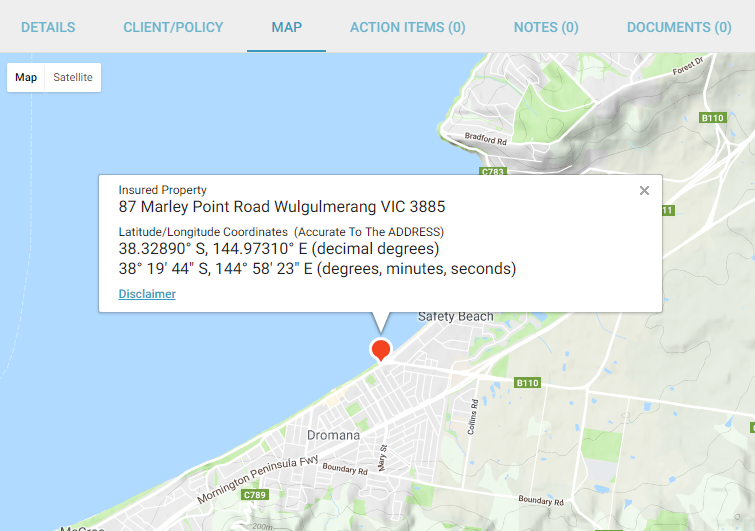
MAP
The Map tab displays a Google Map of the assignment's location.
- Click the plus and minus buttons in the bottom right corner of the map to zoom in and out.
- Click the Fullscreen icon in the top right corner of the map to expand the map so it fills your entire screen.
- Click the Satellite button in the top left corner of the map to view the map in satellite imagery mode.
- Click the person icon in the bottom right corner of the map and drag it to a location on the map to see actual photo imagery of the location.
- Click the reset icon in the bottom right corner of the map to reset the map with the assignment location in the center.
The coordinates provided in the map are also included in assignment email notifications along with a link to the location in Google Maps.
ACTION ITEMS
In the Action Items tab, you can view and create action items (or tasks) related to the completion of the assignment. For example, you can create a Customer Contacted action item with a due date of seven days, and assign it to the assessor assigned to the assignment. The assessor receives an email about the action item. When the assessor contacts the customer and marks the action item complete, you receive an email notification. If the assessor does not complete the action item within seven days, you both receive an email notification.
XactAnalysis automatically updates the status of some action items when certain actions are completed. For example, when an assignment enters the Assignment Queue or estimate is uploaded. You can create action items for these tasks to communicate deadlines and receive notification if something is past due. Some action items, including all custom action items, must be marked complete by a user. Past due action items appear red.

Add an action item
- Click Add Action Item. The Add Action Item dialogue box appears.
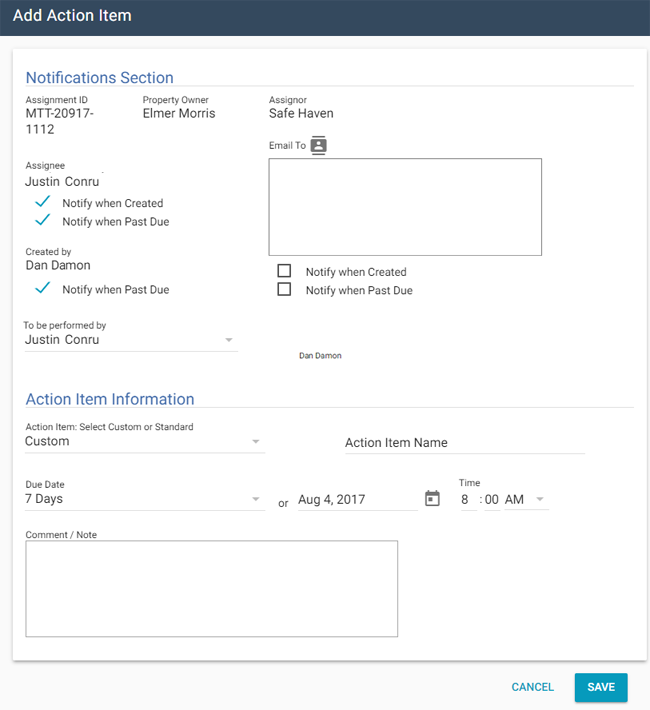
- Complete the Add Action Item dialogue box as follows:
-
Notifications Section
- To Be Performed By: Select the radio button to indicate to whom this task is assigned. You can select either the assignee (for example, the builder) or the creator of the action item (yourself).
- Notify When Created: Select the Notify When…Created check box to notify the assignee or other email recipients when this action item is created.
- Notify When Past Due: Select the Notify When…Past Due check box to notify the assignee, yourself, or other email recipients when the action item is not completed by its due date.
-
Action Item Information
- Custom: Select this radio button to create a custom action item. Name the action item in the provided field.
- Standard: Select this radio button to create a standard action item. Choose an action item from the drop-down menu. See the standard action-item list at the end of this section for more information.
Due In: Select the radio button to indicate the number of days in which this action item is due. You can select 1, 7, 14, 28 Days, or Other. - Due Date: This will display the due date or, if you selected Other, allow you to fill in the due date.
- Time: Enter the time at which this action item will be due
- Comment/Note: Enter any additional note regarding this action item
- Click Save.
Delete an action item
- Click Delete next to the action item. A confirmation dialogue box appears showing the action-item details.
- Click Delete. The action item is removed from the Action Items tab.
Mark an action item complete
- Click Mark Complete next to the action item you want to mark as complete. The Update Status dialogue box appears.
- Complete the Update Status dialogue box as follows:
- Date Updated: This field defaults to the current date. You can change the date as needed.
- Comment/Note: Enter a note in this field. The note will be added to the Notes tab.
- Email To: Enter a recipient email address, or select email addresses from your address book. Select the check boxes to send an email to additional recipients and to include the Note text in the email.
- Send to XactNet® Address: Enter a recipient XactNet address, or select XactNet addresses from your address book. Separate multiple addresses with a semicolon.
- Click Update Status. The action item no longer appears in the action-item list, and a note is added to the Notes and Activity Log tabs.
Standard Action Item list
The following list of standard Action Items allows you to set a task:
Assignment Received
The date the assignment was first received into the Assignment Queue or assigned to an assessor or builder. If the assignment was sent to the Assignment Queue first, the Received date is updated when it is assigned to an assessor or builder. After being assigned the first time, the Received date is no longer updated (the Reassignment, Referral, or Collaboration statuses are used instead).
Enter Assignment Queue
To request notification when the assignment has entered the Assignment Queue.
Send Notification
To send notification to selected individuals.
Download Assignment
For a builder or assessor to downloaded the assignment.
Contact Customer
To make contact with the insured.
Inspect Job Site
To inspect the job site.
Upload Non $0 Estimate
To upload a non $0 estimate for the assignment.
Upload Estimate
To upload an estimate for the assignment.
Upload Correction
To upload a correction for the assignment.
Upload Report
To upload a report for the assignment.
Submit to Insurer Review Queue
To request the assignment be reviewed by the insurer.
Submit to Service Provider Review Queue
To request the assignment be reviewed by an independent assessing company.
Assign Insurer Reviewer
To request that a insurer reviewer be assigned by a specific date.
Assign Service Provider Reviewer
To request that a builder or assessor reviewer be assigned to the assignment by a specific date.
Insurer Review with Exceptions
Insurer has marked the assignment Reviewed w/ Exceptions.
Insurer Review
To request that the insurer review the assignment.
Service Provider Review with Exceptions
Service Provider has marked the assignment Reviewed w/ Exceptions.
Service Provider Review
To request that the associated builder or independent assessing company review the assignment.
Review with Exceptions
The assignment has been marked Reviewed w/ Exceptions.
Review
To request a review of the assignment.
Assigned Out of Assignment Queue
The assignment should be assigned out of the Assignment Queue.
QA Rejected
The assignment has been marked QA Rejected.
QA Approved
The assignment has been marked QA Approved.
Collaboration Checked Out
The assignment has been checked out for collaboration.
Collaboration Checked In
Collaboration has been completed, and the assignment is checked back in.
Client Approved
The assignment has been marked Client Approved.
Client Rejected
The assignment has been marked Client Rejected.
Start Work
To start work on the assignment.
Complete Job
To complete the job and mark it Job Completed in Xactimate.
File Closed
The assignment has been marked File Closed.
Entered Reinspection Queue
The assignment has been sent to the Reinspection Queue.
Assign Reinspector
To request that the assignment be assigned to a reinspector.
Complete Reinspection
To request a time when the reinspection of the assignment should be complete.
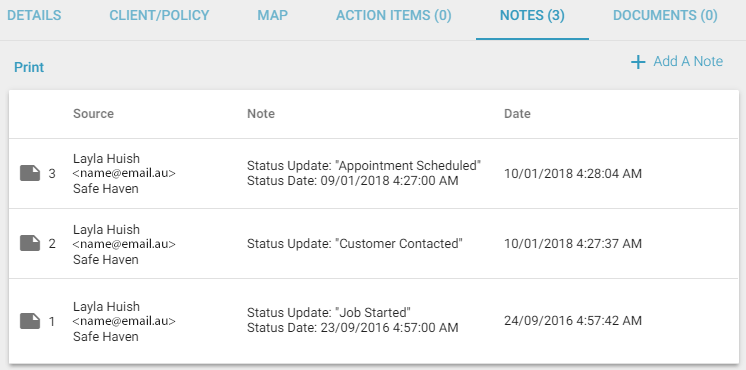
NOTES
In this tab, you can manually enter notes related to the assignment. XactAnalysis also automatically adds system notes as certain assignment events occur, for example status updates or action item events.
- Change whether or not XactAnalysis SP users can view a note by clicking the link in the Excluded from XASP column.
- You can add a reply to non-automated notes by clicking the Reply link next to the note. Reply notes appear under the original note as well as anywhere else notes are displayed.
Add a note
- Click Add a Note. The Add a Note dialogue box appears.
- Complete the Add a Note dialogue box as follows:
- Note: Type the text of the note. You can add formatting (for example bold, italics, and underline) and use spell check.
- Email To: Enter any email addresses you would like to notify regarding this note. Each address must be separated by a comma. You can also click the smart list icon to select email addresses from your address book.
Check boxes are available that allow you to quickly send the email to individuals involved with the assignment. There are also check boxes that allow you to include the note in the body of the email notifications, exclude the note from XactAnalysis SP, and include a custom signature with your notes. - Send to XactNet Address: Enter any XactNet address to which you would like the note sent, or select XactNet addresses from your address book. Separate multiple addresses with a semicolon.
- Click Add Note.
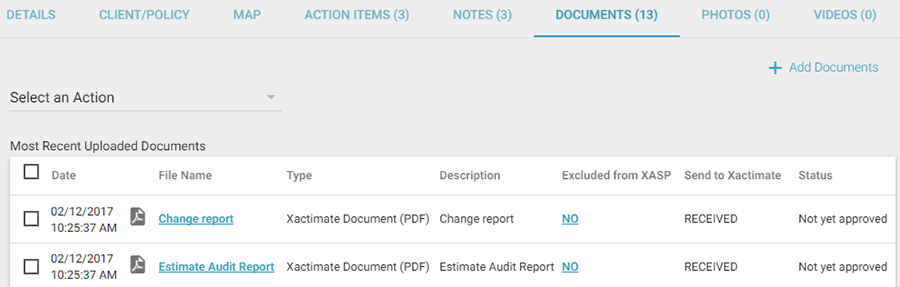
DOCUMENTS
When an estimate is completed and returned to XactAnalysis, it has a number of documents attached, such as the Report Rough Draft, Price List Variation Report, and Audit Report, as well as any custom documents that were uploaded by the assessor/builder.
- Click a document name to view it in a separate window.
- Change whether or not XactAnalysis SP users can view a document by clicking the link in the Excluded from XASP column.
- Send a document to Xactimate by clicking No in the Send to Xactimate column.
- Compressed: .zip
- Documents: .doc, .docx, .docm, .html, .htm, .mht, .msg, .pdf, .txt, .xls, and .xlsx
- Image: .jpg, .jpeg, and .png
- Sound: .wav, .mp3, and .wma
Add a document
- Click Add Documents. The Upload Documents dialogue box appears.
- Click Select Files. Select files to upload.
- To upload a document to Xactimate as well, select the Send to Xactimate checkbox.
- Type a file description in the Description field.
- Click Complete Upload. The documents appear in the Documents tab.
- Compressed: .zip
- Documents: .doc, .docx, .docm, .html, .htm, .mht, .msg, .pdf, .txt, .xls, and .xlsx
- Image: .jpg, .jpeg, and .png
- Sound: .wav, .mp3, and .wma
Approve or reject items
Companies use the Approve and Reject statuses in various ways. Some companies use these statuses to trigger an export of documents to another system. Some independent assessors and builders may prevent a carrier from accessing documents until they are marked approved.
- To approve an item in the documents list, select the check box at the end of the item row. Click Approve Item(s).
- To reject an item in the documents list, select the check box at the end of the item row. Click Reject Item(s).
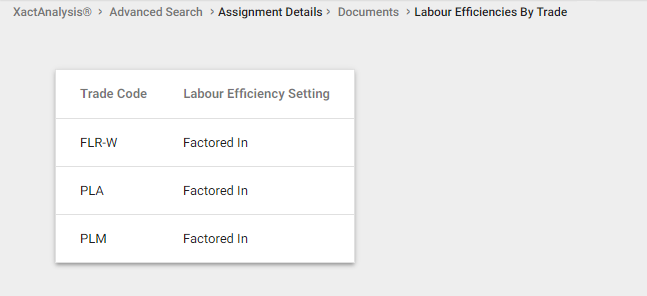
The View Labur Efficiencies by Trade report
When an estimate is created in a version of Xactimate that allows a separate labour efficiency setting by trade, a View Labour Efficiencies by Trade link appears above the document list. The labour efficiencies link displays each labour-efficiency setting that was used for each trade.
PHOTOS
The Photos tab displays thumbnails of any images associated with an assignment.
- Click a photo name to view it in a separate window.
- Change whether or not XactAnalysis SP users can view a photo by clicking the link in the Excluded from XASP column.
- Send individual photos to Xactimate by clicking the link in the Send to Xactimate column.
- Send multiple photos to Xactimate by selecting their check boxes and clicking Send to Xactimate.
Add a photo
Be careful when you add photos to an assignment. Once uploaded, the images and their associated data are permanent and cannot be deleted or edited. However, photos can still be excluded from XASP and sent to Xactimate after they have been uploaded.
- Click Add Photos. The Upload Images dialogue box appears.
- Click Select Files. Select files to upload.
- Type a file description in the Description field.
- Type a tag in the Tags field, if needed.
- Click Complete Upload. The photos appear in the Photos tab.
Filter by tags
Photos can be tagged in Xactimate or in XactAnalysis.
- Click the drop-down menu to the left of the Filter by Tags button.
- Select whether you want to search for photos that have all of your selected tags or any of your selected tags using the appropriate radio button.
- Select the check boxes for the tags that apply to your search.
- Click Filter by Tags. Photos with the selected tags appear in the Photos tab.
VIDEOS
If the Video Collaboration feature is enabled, you can initiate video chat sessions with users of the ClaimXperience mobile app. To initiate a video chat session, click Start Video Collaboration. Any recordings made during a video chat session are stored here. Click a video to watch it in a separate window.
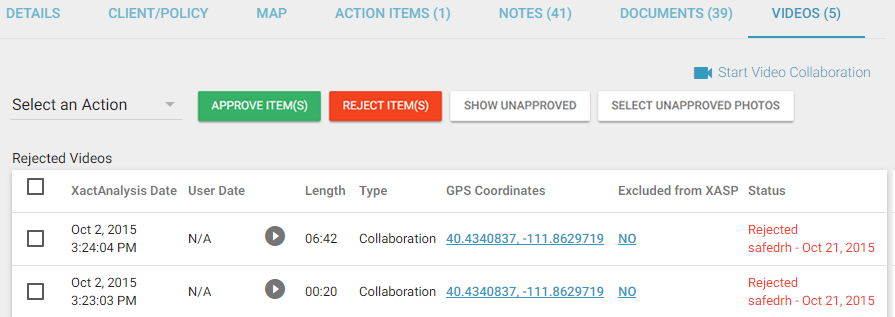
Approve or reject items
Companies use the Approve and Reject status in different ways. Some companies use these statuses to trigger an export of data to another system. Some independent adjuster and contractor may prevent a from accessing documents until they are marked approved.
- To approve an item in the videos list, select the check box at the end of the item row. Click Approve Item(s).
- To reject an item in the videos list, select the check box at the end of the item row. Click Reject Item(s).
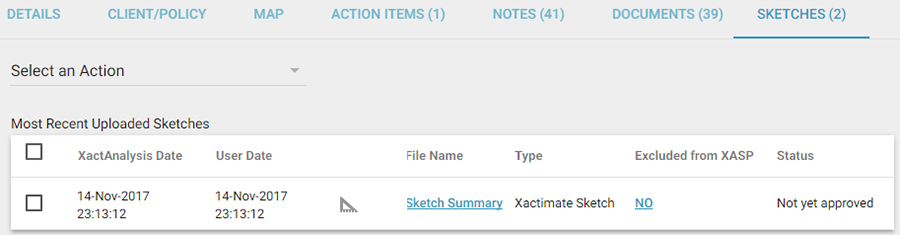
SKETCHES
When Xactimate Sketches are uploaded with an estimate, they are rendered as a PDF with one image per level.
- Click a sketch name to view it in a separate window.
COMMUNICATION LOG
The Communication Log tab displays the date and time of assignment events, including when photos, documents, notes, videos, sketches, and action items are added. These events are sorted into collapsible lists by date.
- Click the drop-down menu on the User Name column to filter a list.
- Click a document, photo, video, or sketch name to view it in a separate window.
HISTORY
If an assignment has been reassigned, a History tab appears on the Assignment Details page. This tab shows the Details tab information for each previously assigned assessor/builder. The current assignee information is shown on the Details tab.
PREVIOUS LOSS
The Previous Loss tab displays all loss information from previous claims associated with the policy number. XactAnalysis does this by comparing the policy number of the claim with the policy number of all previous claims. If there is a match, XactAnalysis sends the previous loss information with the assignment. The following information is displayed in both Xactimate and XactAnalysis:
- Policy #
- Reference #
- Loss Date
- Peril
- Estimate Amount (Gross Estimate Total)
- Deductibles
Click the Claim # to view the Assignment Detail page for the previous loss.